追光
论坛回复已创建

-
作者帖子
-
-
2026-06-14 - 21:09 #132531

追光参与者macOS系统中微信等软件已授权截图与录像权限,但使用时仍反复弹出授权请求。
排查过程:尝试通过Codex环境自动检测,但因底层执行器故障(无法启动shell进程),未能直接读取或修改系统授权数据库。
原因分析:典型TCC隐私授权记录卡死、应用路径/签名变更,或tccd服务缓存异常。
修复步骤(已指导用户手动执行):
1. 完全退出微信及相关截图/录屏工具。
2. 打开终端,执行重置命令:/usr/bin/tccutil reset ScreenCapture /usr/bin/tccutil reset Microphone(若仅针对微信,可执行:
/usr/bin/tccutil reset ScreenCapture com.tencent.xinWeChat3. 重启隐私权限服务:
/usr/bin/killall tccd4. 重启电脑。
5. 进入“系统设置 隐私与安全性 屏幕录制”,重新开启相关开关,并按系统提示重启应用。
备选方案:若问题依旧,建议从官网重新下载安装微信(避免从网盘或下载目录直接运行,以防路径变更导致权限失效),并复查“辅助功能”与“输入监控”权限。
后续跟进:建议重启Codex会话,待本机命令执行环境恢复后,可进一步深度检测TCC数据库及应用签名状态。
-
2026-06-13 - 16:36 #132509
追光参与者acestep.cpp:跨平台本地AI音乐生成引擎(GGML + C++实现)
官方仓库GitHub – ServeurpersoCom/acestep.cpp
开发语言:C++ (C++17 标准)
核心框架:GGML
技术定位:ACE-Step 1.5 推理后端 / 离线音频生成引擎
acestep.cpp 是一个基于 GGML 的跨平台本地 AI 音乐生成引擎,使用 C++17 实现 ACE-Step 1.5 推理后端,可在 CPU、CUDA、Vulkan、Metal、ROCm 等多种硬件上运行。项目支持文本生成音乐、歌词生成、音频合成与翻唱等功能,并提供完整 WebUI 与 HTTP API 服务。
用户只需输入音乐描述或歌词,即可生成 48kHz 立体声音频(MP3/WAV),同时支持 LM + DiT + VAE 多模型组合推理,并可通过 GGUF 量化模型在消费级设备上高效运行。系统还支持 Adapter/LoRA 风格扩展、模型热切换、以及多步采样器(Euler、DPM++ 等)。
整体设计强调“本地化 + 高性能 + 多后端兼容”,适合开发者构建 AI 音乐应用、二次开发或离线生成系统。
🤖 任务指令:部署 acestep.cpp 并开发歌曲创作 Skill
请按顺序执行以下步骤,并在关键节点向我确认进度。
1. 基础环境部署
目标目录: /Users/xbaby

克隆项目: 将 GitHub 仓库 https://github.com/ServeurpersoCom/acestep.cpp 克隆至目标目录下。

编译与安装: 根据项目 README 文档,检查并安装所需的依赖(如 C++ 编译器、CMake 等),完成项目的编译与构建。

2. 功能验证与基础测试
在本地运行编译后的二进制文件或脚本,验证项目是否能正常工作。

输出要求: 记录成功运行的基础命令和输出结果,确保核心功能无报错。

3. Skill 开发 (Skill Creation)
将上述测试成功的核心方法与命令封装成一个专门的 Skill。

Skill 定义: 该 Skill 将用于辅助歌曲创作。请合理定义其输入参数(如提示词、风格、音轨设定等)和输出格式。

4. 歌曲创作全面测试
Skill 编写完成后,依次进行以下四个场景的自动化或手动测试,并记录测试输入与输出结果:

完整歌曲创作测试: 测试包含人声/主旋律及伴奏的完整歌曲生成。

纯音乐创作测试 (Instrumental): 测试无歌词、纯乐器编曲的生成能力。

翻唱/改编测试 (Cover): 测试基于已有旋律或结构进行二次创作/翻唱的能力。

歌曲续写/补全测试 (Complete): 测试输入一段音频或乐谱残片,由 Skill 补全后续内容的能力。

5. 最终交付
提供部署成功的确认信息。

展示新创建的 Skill 的配置代码或调用声明。

附上上述 4 项测试的简要报告(输入、输出路径、是否成功)。

如果你准备好了,请先从第一步(克隆与编译)开始,并在遇到任何环境依赖问题时及时提示我。
因我之前已经手工下载好了模型,所以懒得等待漫长的下载,于是中途介入,其实这一步也应该放在上方的规划中,中途介入也可以,但效率会低一点。
继续上方的任务我的模型在 /Users/xbaby/Documents/AiModel/ACE 已经下载好,中断上方下载,继续你的任务根据 ACE-Step 的技能文档,服务器模式的启动命令和配置如下:
🚀 ace-server 启动命令
基本用法(使用默认配置):
cd /Users/xbaby/ACE/build
./ace-server --models /Users/xbaby/ACE/models
自动访问地址: http://localhost:8085
默认端口: 8085(Web UI 服务)API服务完整命令示例:
cd /Users/xbaby/ACE/build
./ace-server \\
--models /Users/xbaby/ACE/models \\
--port 8080 \\
--host 127.0.0.1
访问方式:
Web UI: http://localhost:8085(无论端口设为什么,Web UI 都在 8085)
API 服务: http://localhost:(如 8080)启动后会同时提供:
1. Web UI 界面(用于图形化操作)
2. REST API 接口(用于编程调用) -
2026-06-11 - 11:56 #132495
追光参与者AI 大模型省 Token 技巧大全:9 个降低 API 成本与提升效率的方法
尽可能使用 CLI、规划任务、减少不必要的 Skill”非常切中要害,这些都是针对 Multi-Agent(多智能体,如 OpenAI Swarm 等框架)或自动化工作流的优秀优化策略。
在实际开发和调教大模型(尤其是多智能体/Swarm 架构)时,还可以从以下几个维度把 Token 压到极致:
4、善用 Prompt Caching(提示词缓存)
做法: 现代大模型(如 DeepSeek、GPT-4o)都支持缓存。在编写 System Prompt 或工具描述时,保持头部内容完全一致。
效果: 命中缓存的输入 Token 价格能打 1~2 折,能极大省下“滚雪球”式对话的成本。
5、精简结构化输出(JSON Optimization)
做法: 如果需要 AI 返回 JSON,不要让它返回冗长的 key 或无用的嵌套。可以用缩写(如用 id 代替 useridentificationnumber),或者给模型提供精简的 Schema 示例。
效果: 输出 Token 贵 3~4 倍,少输出一个字母都是在直接省钱。
6、限制历史轮数与总结上下文(Context Window Management)
做法: 严格控制携带的历史对话轮数(滑动窗口机制),或者在对话变长时,让一个轻量级模型对前文进行“摘要压缩”,只保留核心记忆。
效果: 砍掉历史里的废话,直接阻止输入 Token 的指数级暴涨。
7、用小模型/本地模型做前置过滤(Tiered Routing)
做法: 不要什么任务都直接无脑无状态扔给最贵的顶尖模型。先用体积小、便宜(甚至本地免费)的模型做意图识别或内容清洗,确认需要高级推理时,再转交给大模型。
效果: 用一分钱的成本过滤掉八成无效请求。
8、精简 Skill 的输入输出描述
做法: 在注册 Function/Skill 时,Docstring(工具描述)要字字珠玑,只写核心参数说明,去掉修饰词和礼貌用语。
效果: 因为 Skill 描述是作为 System Prompt 常驻上下文的,每次对话都会被重复计费,精简它可以一劳永逸。
9、合并同类请求(Batch Processing)
做法: 避免频繁的单条对答。如果是批处理任务(如批量翻译、批量分类),尽量在单次 Prompt 里用列表形式传给 AI 一次性处理。
效果: 减少了重复发送系统提示词和上下文的次数。
-
2026-06-11 - 09:22 #132489
追光参与者2026年3月-6月11日:北京、朝阳。今年,我将主要精力聚焦于AI模型在内容与具体服务场景中的深度应用,而非对NewVFX进行更多的底层开发。
在技术学习方面,我着重掌握了SD系列模型,大幅提升了图片创作与精细化编辑的能力;同时,深入探索了Step ace 1.5模型在音乐制作上的潜力,并熟练应用了TTS(文本转语音)及Whisper(语音识别)等模型,有效打通了多模态内容生成的链路。
在业务实践上,我将大量时间投入到Agent(智能体)的应用落地中,致力于通过AI Agent优化具体服务流程,提升内容产出的效率与交互体验。这一策略转变让我更贴近实际业务需求,也为未来NewVFX的智能化服务升级积累了宝贵的实践经验。
-
2026-06-01 - 18:31 #132410
追光参与者对应M1至M5系列芯片的性能数据: Llama 7B 模型在不同量化精度下的性能测试数据
Apple M系列芯片 Llama 7B 性能对比表
1. M1系列 (第一代Apple Silicon)
型号GPU核心内存带宽 (GB/s)F16 PP (t/s)F16 TG (t/s)Q8_0 PP (t/s)Q8_0 TG (t/s)Q4_0 PP (t/s)Q4_0 TG (t/s)M1868––117.257.91117.9614.15M1 Pro16200302.1412.75270.3722.34266.2536.41M1 Max32400599.5323.03537.3740.20530.0661.19M1 Ultra648001168.8937.011042.9559.871030.0483.73
2. M2系列 (第二代,工艺优化)
型号GPU核心内存带宽 (GB/s)F16 PP (t/s)F16 TG (t/s)Q8_0 PP (t/s)Q8_0 TG (t/s)Q4_0 PP (t/s)Q4_0 TG (t/s)M210100201.346.72181.4012.21179.5721.91M2 Pro19200384.3813.06344.5023.01341.1938.86M2 Max38400755.6724.65677.9141.83671.3165.95M2 Ultra768001401.8541.021248.5966.641238.4894.27
3. M3系列 (第三代,架构升级)
型号GPU核心内存带宽 (GB/s)F16 PP (t/s)F16 TG (t/s)Q8_0 PP (t/s)Q8_0 TG (t/s)Q4_0 PP (t/s)Q4_0 TG (t/s)M310100––187.5212.27186.7521.34M3 Pro18150357.459.89344.6617.53341.6730.74M3 Max40400779.1725.09757.6442.75759.7066.31M3 Ultra808001538.3439.781487.5163.931471.2492.14
4. M4系列 (第四代,带宽提升)
型号GPU核心内存带宽 (GB/s)F16 PP (t/s)F16 TG (t/s)Q8_0 PP (t/s)Q8_0 TG (t/s)Q4_0 PP (t/s)Q4_0 TG (t/s)M410120230.187.43223.6413.54221.2924.11M4 Pro20273464.4817.18449.6230.69439.7850.74M4 Max40546922.8331.64891.9454.05885.6883.06
5. M5系列 (第五代,NPU优化)
型号GPU核心内存带宽 (GB/s)F16 PP (t/s)F16 TG (t/s)Q8_0 PP (t/s)Q8_0 TG (t/s)Q4_0 PP (t/s)Q4_0 TG (t/s)M510153374.359.67489.7817.50636.3631.02M5 Max406141018.3037.581051.5964.61987.10102.93 -
2026-05-27 - 20:33 #132366
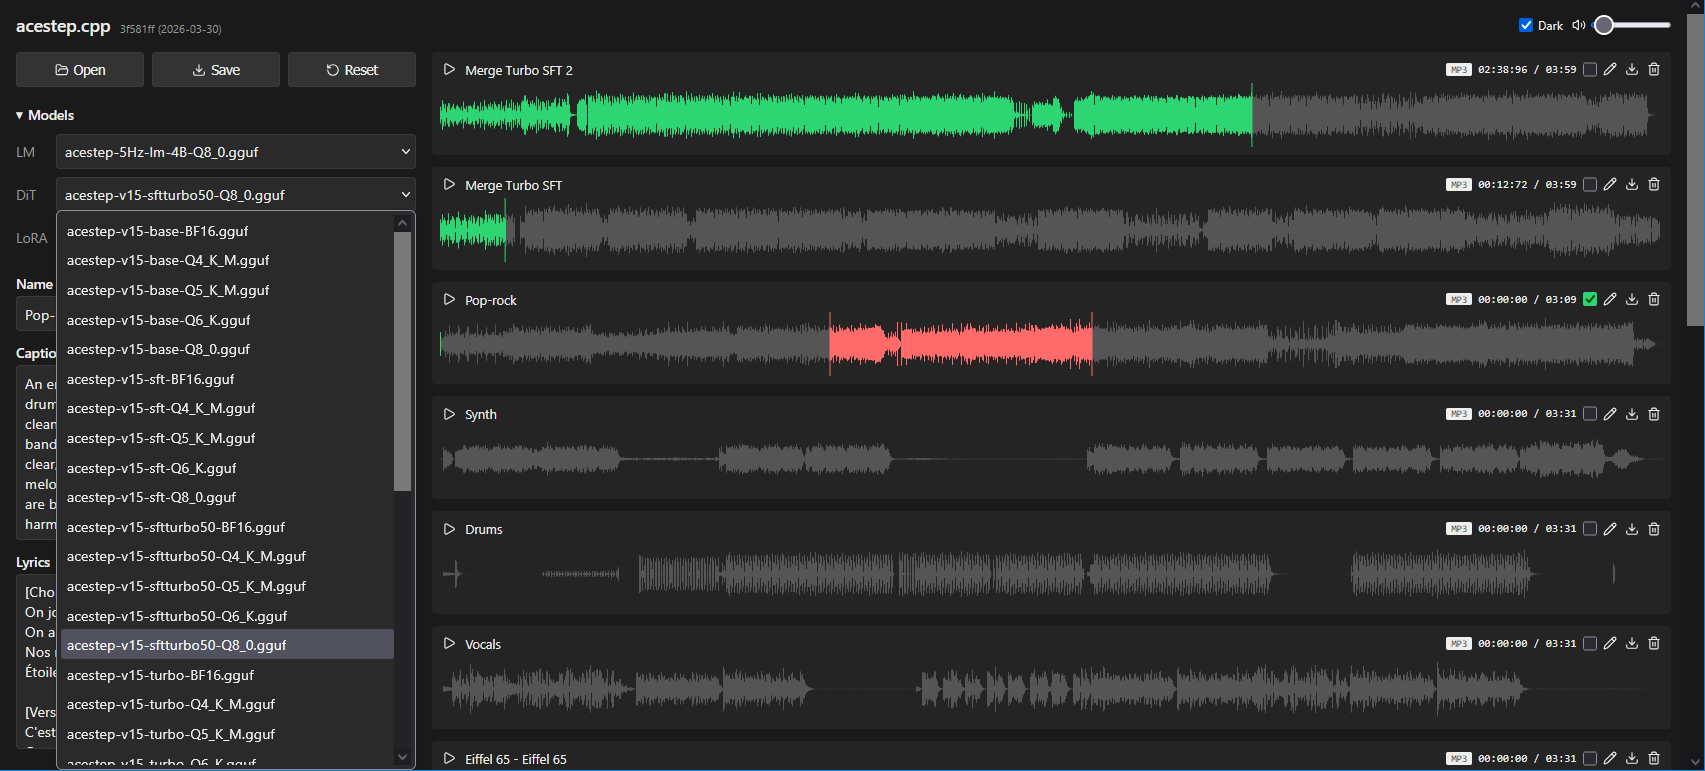
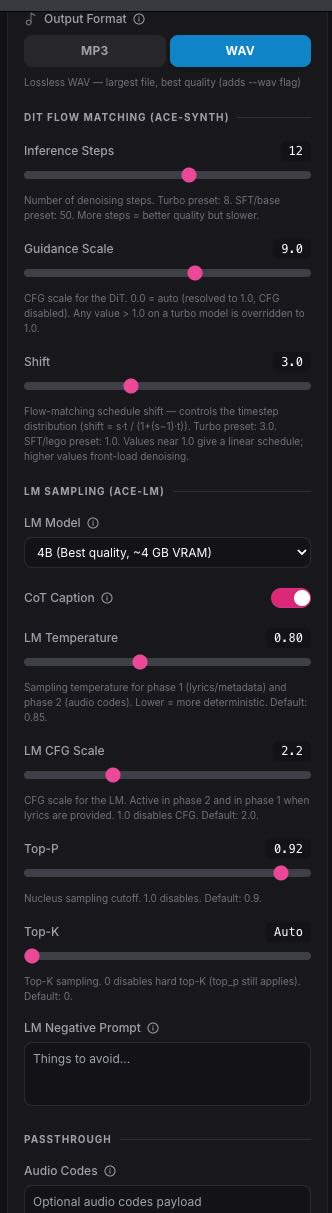
追光参与者这些参数是控制acestep.cpp(Turbo 模型) AI 音乐生成效果的核心“旋钮”。下面拆解这些参数的物理含义和调整建议。
Screenshot
一、 DIT FLOW MATCHING (DiT 扩散模型参数)
这是决定“声音质量”的引擎。
Inference Steps (推理步数)
意义:扩散模型去噪的次数。步数越多,细节越细腻,但越耗时。
Turbo 模型建议:官方预设是 8,你设为 12 是合理的,能稍微增加一点稳定性。不需要过高,否则反而可能产生噪音。Guidance Scale (CFG – 引导强度)
意义:模型服从提示词(Prompt)的程度。
注意:界面显示 9.0,但你在之前的日志中看到过警告。因为 Turbo 模型已经“内化”了引导,数值高于 1.0 可能会导致音频失真或产生“金属感”。强烈建议降至 1.0 – 2.0 之间测试。Shift (流匹配偏移)
意义:控制扩散过程中的采样分布。数值越大,采样越集中在去噪的“早期阶段”。
建议:Turbo 模型预设 3.0 是经过优化的最优值,不需要频繁改动。二、 LM SAMPLING (语言模型参数)
这是决定“音乐结构、歌词、风格逻辑”的大脑。
LM Model
意义:选择核心逻辑模型的大小。4B 代表模型拥有 40 亿参数,逻辑推理更强,音乐结构的编排更合理。CoT Caption (思维链描述)
意义:开启后,AI 会先对自己要生成的音频写一段“自我描述”(Chain of Thought),以此指导生成,效果更好。建议保持开启。LM Temperature (采样温度)
意义:控制生成的随机性。
0.1 – 0.5:非常死板,适合想要完全忠实于指令。
0.7 – 0.9:创造力平衡点,默认 0.8 很合适。
1.0:可能会开始产生混乱或听不懂的乱码。LM CFG Scale
意义:语言模型层面的引导强度。这与 DiT 引导不同,它控制的是歌词和结构逻辑的连贯性。保持 2.0 – 2.5 即可。Top-P / Top-K
意义:采样过滤器,防止 AI 选择概率极低的词汇(即防止胡言乱语)。
Top-P (0.92):保留累积概率达到 92% 的词,通常默认值效果最好。
Top-K (Auto):直接限制候选词的数量。Auto 模式让模型自己根据词汇分布决定,最稳妥。三、 调整建议(实操建议)
如果你觉得目前生成的音乐“听起来不够自然”或“有杂音”,尝试以下步骤:
1. 首要调整: 将 Guidance Scale 从 9.0 降到 1.0 或 2.0。这是你目前设置中最可能导致失真的地方。
2. 次要调整: 如果音乐逻辑混乱,微调 LM Temperature(降到 0.7)。
3. 速度测试: 如果生成太慢,将 Inference Steps 从 12 降回 8,对比音质损失是否在可接受范围内。进一步建议:官方文档通常会强调 “Shift” 和 “Inference Steps” 的协同效应。在 Turbo 模型中,低步数配合高 Shift 值是为了实现“快速且高质量”的生成。
-
2026-05-25 - 15:55 #132316
追光参与者macOS 推荐使用原生 launchd 实现登录自启,支持后台常驻、崩溃自动重启,且不影响终端会话。
1. 创建日志目录
mkdir -p ~/.hermes/logs2. 编写自启配置文件
cat > ~/Library/LaunchAgents/com.hermes.gateway.plist << 'EOF'
<?xml version="1.0" encoding="UTF-8"?>
<!DOCTYPE plist PUBLIC "-//Apple//DTD PLIST 1.0//EN" "http://www.apple.com/DTDs/PropertyList-1.0.dtd">
<plist version="1.0">
<dict>
    <key>Label</key><string>com.hermes.gateway</string>
    <key>ProgramArguments</key>
    <array>
        <string>/Users/xbaby/.hermes/hermes-agent/venv/bin/hermes</string>
        <string>gateway</string>
    </array>
    <key>WorkingDirectory</key><string>/Users/xbaby/.hermes</string>
    <key>StandardOutPath</key><string>/Users/xbaby/.hermes/logs/gateway.log</string>
    <key>StandardErrorPath</key><string>/Users/xbaby/.hermes/logs/gateway.err</string>
    <key>RunAtLoad</key><true/>
    <key>KeepAlive</key><true/>
</dict>
</plist>
EOF
3. 加载并启用
launchctl load ~/Library/LaunchAgents/com.hermes.gateway.plistlaunchctl start com.hermes.gateway4. 验证与管理
# 查看运行状态 launchctl list | grep hermes # 实时查看日志 tail -f ~/.hermes/logs/gateway.log # 手动停止/重启 launchctl stop com.hermes.gateway launchctl start com.hermes.gateway注意:配置已按你的实际路径写死。若后续 Hermes 大版本更新导致 venv 路径变化,需同步修改 ProgramArguments 并执行 launchctl unload ~/Library/LaunchAgents/com.hermes.gateway.plist 后重新 load 生效。
配置完成后,下次登录 macOS 网关将自动后台运行,无需手动开终端。
-
2026-05-24 - 10:20 #132278
追光参与者pinokia版本的Ace step Ui在实践中的吞字问题,和无法使用添加乐器、编曲功能
目前在 Mac 的 MLX 生态中,官方及社区仅推出了 Turbo 这一款加速版模型。虽然它能8步就能出歌,但因为砍掉了语言模型(LM)的对齐逻辑,导致它有着极易“吞字、漏字”的顽疾,且在 MLX 下无法使用 Base 和 SFT 版本。不能使用 MLX 的其他版本(Base/SFT),最核心的原因并不是 Mac 硬件不支持,也不是Ace Step Ui不支持而是开源社区压根就没有做出这些格式的模型文件。
如果想在Mac上解锁 ACE-Step 1.5 的完整实力,强烈建议转向基于 GGUF 格式的 C++ 生态(如 acestep-cpp-ui):
功能全开:完美支持 GGUF 格式的 SFT(对齐微调版)、Base(基础版) 以及社区魔改的 XL 混血模型,彻底根治吞字、破音问题。
极度轻量:支持 Metal 硬件加速。选择 Q4KM 级别量化,整套系统运行仅吃 6~8GB 内存,在 12GB 的 Mac 上不仅流畅,还能免去配置 Python 虚拟环境的痛苦。
-
2026-05-23 - 10:06 #132252
追光参与者这是一个用于 macOS 的 Hermes WebUI 自动化启动与守护安装脚本,用于一键配置 launchd 服务,使 WebUI 在系统登录后自动启动并保持运行。脚本首先清理旧的 launchd 配置,避免因残留任务导致冲突或重复加载,然后在用户的 LaunchAgents 目录中重新生成标准 plist 文件。该配置通过 ProgramArguments 直接调用 start.sh 脚本,避免使用 cd && 等复杂 shell 组合,从而提升 launchd 执行的稳定性与兼容性。同时脚本会自动执行 plist 语法校验,确保 XML 格式正确无误
cat <<'EOF' > ~/install_hermes_webui.sh
#!/bin/bash

set -e

PLIST=~/Library/LaunchAgents/com.hermes.webui.plist

echo "🧹 清理旧服务..."
launchctl bootout gui/$(id -u) $PLIST 2>/dev/null || true
rm -f "$PLIST"

echo "📦 写入 plist..."
mkdir -p ~/Library/LaunchAgents

cat > "$PLIST" <<'PLISTEOF'
<?xml version="1.0" encoding="UTF-8"?>
<!DOCTYPE plist PUBLIC "-//Apple//DTD PLIST 1.0//EN" "http://www.apple.com/dtds/propertylist-1.0.dtd">
<plist version="1.0">
<dict>

    <key>Label</key>
    <string>com.hermes.webui</string>

    <key>ProgramArguments</key>
    <array>
        <string>/bin/bash</string>
        <string>/Users/xbaby/hermes-webui/start.sh</string>
    </array>

    <key>RunAtLoad</key>
    <true/>

    <key>KeepAlive</key>
    <true/>

    <key>WorkingDirectory</key>
    <string>/Users/xbaby/hermes-webui</string>

    <key>StandardOutPath</key>
    <string>/tmp/hermes-webui.out.log</string>

    <key>StandardErrorPath</key>
    <string>/tmp/hermes-webui.err.log</string>

</dict>
</plist>
PLISTEOF

echo "🔍 校验 plist..."
plutil -lint "$PLIST"

echo "🚀 启动服务..."
launchctl bootstrap gui/$(id -u) "$PLIST" || true
launchctl kickstart -k gui/$(id -u)/com.hermes.webui

echo "✅ 完成!Hermes WebUI 已设置为开机自启"
EOF

chmod +x ~/install_hermes_webui.sh
使用方法(只需要一次)
~/install_hermes_webui.sh -
2026-05-23 - 08:49 #132235
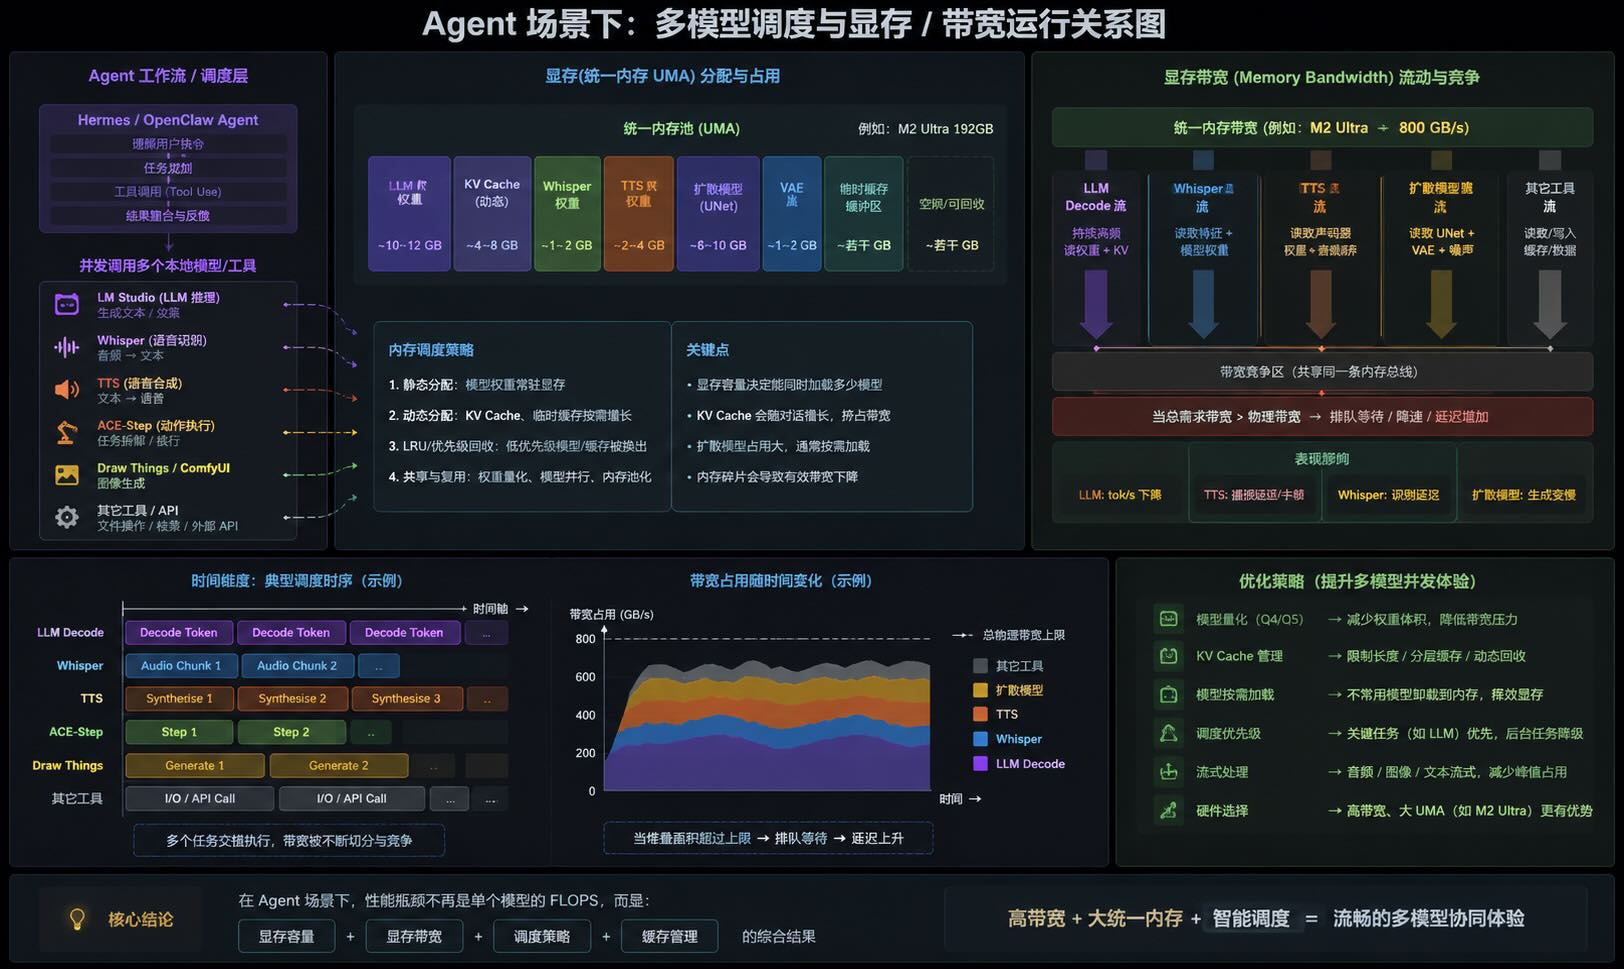
追光参与者为什么 Agent 会把“显存带宽问题”无限放大
传统本地大模型通常只有:一个 LLM,一个 KV Cache,一个 Decode 循环,但在 Hermes、OpenClaw 这类 Agent 系统中,大模型已经不再只是“聊天机器人”,而更像一个 AI 调度中枢(Orchestrator)。

我经常使用的场景是这样的:
LM Studio:负责主 LLM 推理;Whisper:负责语音识别;TTS:负责语音合成;ACE-Step:负责音乐制作;Draw Things / ComfyUI:负责图像和视频,此时系统实际上是在同时运行多个 AI 模型。
这意味着显存中会同时存在:LLM 权重、Whisper 权重、Diffusion UNet、VAE、KV Cache、多进程共享缓存,因此真正的瓶颈,往往已经不再只是 GPU FLOPS,而会逐渐变成:
\(\text{Memory Traffic} + \text{Bandwidth} + \text{VRAM Capacity}\)
尤其在 Apple Silicon 的统一内存架构(UMA)下:CPU、GPU、NPU共享同一块内存池,虽然减少了 PCIe 数据拷贝,但也意味着所有 AI 模型都在争抢同一条“显存高速公路”。
例如:M1 Pro:约 200 GB/s;M2 Ultra:约 800 GB/s,当 Hermes 同时调度:LLM、Whisper、TTS、SDXL,系统瓶颈通常会迅速从“单模型推理”,演变成:
\(\text{多模型内存调度} + \text{KV Cache 管理}\)
因此在 Agent 时代,高带宽、大统一内存与缓存调度能力,往往会比单纯增加 GPU Core 数量更加重要。
当 Hermes 同时调用本地 LLM 与 TTS(如 XTTS)时,两个模型会同时争抢统一内存带宽。LLM Decode 本身已属于 \(\text{Memory-Bandwidth Bound}\),而 TTS 还需持续读取声码器与音频缓存。因此在 Apple Silicon 的 UMA 架构下,多模型并发极易导致 tok/s 下降、音频卡顿与 KV Cache miss 增加,本质上是多个模型在竞争同一条 Memory Bandwidth 通道。
-
2026-05-22 - 21:00 #132221
追光参与者✦ Apple Silicon 显存带宽对推理速度的真实影响(M1 Pro vs M2 Ultra)
以 Apple Silicon 为例,可以非常直观地理解“Decode 阶段为什么被显存带宽限制”。
在本地运行大模型时,Decoding 阶段的速度在很大程度上近似受以下关系约束:
\(\text{tok/s} \approx \frac{\text{Memory Bandwidth}}{\text{Model Size}}\)
在 Apple 的统一内存架构(UMA)下,CPU 与 GPU 共享同一块高带宽内存,因此显存带宽直接决定了模型“逐 token 读取权重”的上限。
以实际芯片为例:
* M1 Pro:统一内存带宽约 200 GB/s
* M2 Ultra:统一内存带宽约 800 GB/s假设运行一个经过 4bit 量化后的 9B 模型,权重体积约为 5GB,则理论 Decode 吞吐上限可近似估算为:
* M1 Pro:
\(\frac{200}{5} \approx 40 \ \text{tok/s}\)
* M2 Ultra:
\(\frac{800}{5} \approx 160 \ \text{tok/s}\)这说明在模型结构与参数完全一致的情况下,仅靠带宽提升,理论输出速度可以达到 4 倍差距。
需要注意的是,这只是理想化上限,实际速度还会受到 KV Cache、量化 kernel、attention 实现方式(如 FlashAttention / Metal kernel 优化)以及上下文长度影响。
但这个例子足以说明一个核心事实:
在本地大模型推理中,Decode 阶段的性能瓶颈,本质上是“单位时间内能从内存搬运多少模型权重”,而不是 GPU 算力本身。
因此在 Apple Silicon 上升级芯片时,带宽提升往往比单纯核心数提升更直接影响 LLM 速度体验。
同时也不能忽略 GPU 算力(TFLOPS)的影响
在 Prefill 阶段以及部分 Decode 的 attention / MLP 计算中,矩阵乘法仍然需要依赖 GPU 的并行计算能力。如果 GPU 算力较弱,即使拥有较高内存带宽,也会出现“数据喂得动但算不动”的情况。尤其在长上下文或高 batch 场景下,算力不足会导致 Tensor Core 利用率下降,从而限制整体吞吐上限。因此本地推理性能本质上是显存带宽与算力的共同约束结果。
-
2026-05-22 - 10:41 #132196
追光参与者Hermes Agent优化首轮对话prompt方法与智能程度的方法
要优化 Hermes 的首次提交速度并解决幻觉,必须去它的用户目录(通常在 ~/.hermes/)对后台自动生成的 Markdown 文件进行物理裁剪,将前缀控制在 500字(2000字符) 以内。
一、 物理剔除不准确的“伪记忆”
Hermes 会在后台偷偷把历史对话的错误推论写进文件,导致首次开机时不仅慢,还会携带错误认知。进入目录:
cd ~/.hermes/memories/打开 MEMORY.md(事实记忆)与 USER.md(用户偏好)。
像删坏代码一样,物理整行抹去过期的环境变量、废弃的临时信息和错误的业务推论。只留下你真正要的语气和世界观(SOUL.md)。
二、 物理裁撤多余的“废 Skills”
Hermes 有个自进化闭环,会自作聪明地把一些临时 Debug 流程固化成自动化技能,导致技能索引极其冗长。进入目录:
cd ~/.hermes/skills/逐个审查这些文件夹。只要发现是“一次性生成”、“名字奇怪”或“你根本用不到”的技能,直接整块物理删除(rm -rf 文件夹)。
三、 前缀锁死(防止再次污染)
物理清理后,确保你每次对话最先输入的 System 前缀在结构上绝对静态。不要把动态的实时时间戳或变动的日志插在头部,只要错一个字符,好不容易清理干净的 KV 缓存就会彻底判定失效。 -
2026-05-21 - 14:49 #132164
追光参与者gstack 与 gbrain 是专为本地模型打造的高阶 Agent 增强外挂
在 Hermes 生态中,gstack 与 gbrain 是专为本地模型打造的高阶 Agent 增强外挂:
gstack(记忆堆栈): 本地轻量化向量与知识图谱数据库,赋予模型持久的本地长文本记忆。
gbrain(认知大脑): 核心任务拆解与工具调度引擎,负责多步骤深度思考(Reasoning Loop)。三步安装与激活步骤
第一步:一键配置安装组件
打开 Mac 终端,运行 Hermes 内置的包管理器命令,自动下载依赖包:
hermes plugin install gstack gbrain第二步:编辑配置文件追加参数
运行 hermes config edit 打开 ~/.hermes/config.yaml 配置文件,在文件末尾追加以下激活代码(已完美对齐你的 AIwork 目录与双后端架构):
yaml
=====================================================================
Hermes 高阶 Agent 扩展组件配置
=====================================================================
gstack:
enabled: true
storagepath: /Users/xbaby/Sites/AIwork/gstackdata
vectordim: 1024

gbrain:
enabled: true
primaryengine: lmstudio  🎯 绑定具备视觉与高智商的 LM Studio 主通道
fallbackengine: custom  主通道异常时自动降级到 omlx 备用通道
maxthoughtsteps: 10
第三步:热重启常驻后台服务
运行你之前配置成功的自启服务重启命令,使新加入的“大脑”与“记忆”组件立刻生效:
bash
launchctl kickstart -k gui/$(id -u)/com.xbaby.hermes-runner🔍 验证激活状态
运行以下命令查看输出日志,确认组件是否正常轰鸣:
bash
tail -n 20 /Users/xbaby/Library/Logs/hermes-ui.log成功标志: 日志中出现 [gstack] Vector DB initialized 与 [gbrain] Cognitive loop started 即代表完全体搭建成功。
-
2026-05-21 - 14:28 #132157
追光参与者1. oMLX 后端:追求极限带宽与原生调度的“短跑怪兽”
oMLX 强依赖于 Apple 团队开源的 MLX 框架。它绕过了传统跨平台框架的转换损耗,直接在系统底层实现统一内存架构(UMA)的高效并行。
选型 A:Qwen3.5-9B-mlx-lm-mxfp4(微缩块浮点 4位量化版)
体积: 约 4.45 GB。
特点: 官方测试与跑分的“御用模特”。它采用了最前沿的 mxfp4 压缩技术,将模型分成共享缩放因子的微块,能瞬间将 M 芯片的物理带宽和硬件吞吐量塞满。
选型 B:Qwen3.5-9B-MLX-4bit(多模态/标准 4位量化版)
体积: 约 5.93 GB。
特点: 保留了完整的长文本处理逻辑与多模态视觉对齐层。
2. LM Studio 后端:兼容性无敌的“全能六边形战士”
LM Studio 底层基于大名鼎鼎的 llama.cpp,虽然在 Apple Silicon 上的原生极致压榨上略逊于 MLX,但其对模型生态的兼容性和内存回收控制极其稳健。选型:Qwen3.5-9B(标准 GGUF 格式)
特点: 业界最成熟的量化格式。对长文本的注意力机制(Attention)支持非常规范,且对多模态视觉(Vision)任务的图文对齐层有极其稳健的底层驱动支持。
这里推荐的模型都是在M1 pro笔记本,16GB内存的设备上测试,不管是直接对话,还是作为Hermes Agent后端,都有不俗的表现,在文档、资料整理、电脑Terminal操作、图像识别、代码写作上均可胜任。
-
2026-05-21 - 12:47 #132150
追光参与者测试本地部署的模型api是否支持视觉能力的方法
本方法利用 macOS 终端的 curl 工具,直接向本地运行的 API 接口发送一个符合 OpenAI 规范的标准多模态请求。
命令的核心亮点在于使用 Bash 动态管道符 $(base64 -i ‘图片路径’ | tr -d ‘\n’)。它会在发送请求的瞬间,自动将你 Mac 本地的物理图片转换成标准的 Base64 编码字符串 嵌入到 JSON 数据中,免去了手动格式化转换的繁琐步骤。
结果判定与排查指南
运行该命令后,通过返回的 JSON 响应可瞬间判定后端的真实能力:测试通过(支持视觉): 接口成功返回 200 OK,并在 content 中输出了对该图片的结构化文本描述。
测试失败(不支持视觉):
若返回 400 BadRequest 或包含 Invalid type: image_url、Vision model is required 等错误切片,证明该后端(如某些低精度的 mxfp4 跑分版)没有挂载多模态视觉对齐层,仅能处理纯文本。
若提示 Invalid API key,则需检查 -H “Authorization: Bearer 666888” 中的密钥是否与后端面板配置一致。
cat << EOF | curl http://127.0.0.1:55889/v1/chat/completions \
  -H "Content-Type: application/json" \
  -H "Authorization: Bearer 666888" \
  -d @-
{
  "model": "Qwen3.5-9B-MLX-4bit",
  "messages": [
    {
      "role": "user",
      "content": [
        {
          "type": "text",
          "text": "请分析这张图片里的人像特征。"
        },
        {
          "type": "image_url",
          "image_url": {
            "url": "data:image/png;base64,$(base64 -i '/Users/xbaby/Sites/AIwork/images/Screenshot 2026-05-04 at 13.16.19_Closeup.png' | tr -d '\n')"
          }
        }
      ]
    }
  ]
}
EOF
密钥不对的报错,当然测试前也可以关闭大模型后端的api密钥,LM studio和Omlx均支持关闭。
{"error":{"message":"Invalid API key","type":"authentication_error","param":null,"code":null}}%
-
-
作者帖子